

How to Create & Send Reusable Documents
Getting a document signed in Docubee is a quick and painless process. Creating a reusable document from the document you sign frequently can save you time over and over again. In this article, we’ll give you a step-by-step walkthrough on creating and sending reusable documents using Docubee.
Getting Started with Reusable Documents

1. From your dashboard, go to the create reusable documents and form area and select “Get Started” to begin.
2. Next, you’ll want to upload the document you want to have signed. To do this, simply click the “Upload a Document” button to browse your files and select a document. Alternatively, you can drag and drop a document from your desktop into the upload field.
3. Now, you can choose whether you want to create a link to a document or form or create a reusable template.

When to Use “Create a Link to a Document or Form”
The Link to a Document or Form option is good for single-participant documents, like a signup sheet or waiver, which participants can access from a link. Choosing this option means you will share the document via a link and receive a copy each time someone fills it out.
When to Use “Create a Reusable Template”
The reusable template option is for documents and forms that will go to one or to multiple participants that may need to be shared multiple times. This option allows for more customization options like workflow expiration and titles.
4. If you choose the “Create a Reusable Template” option, you will also need to assign roles. Enter the title or name of the signer within the given boxes. By hitting the gear icon next to it, you can add their name, email, and whether they can delegate the signing task to another person. If you selected “Created a Link to a Document or Form”, go ahead and skip this step.
5. If you have multiple workspaces, be sure to check that your document is being deployed to the correct one.
6. Once everything is set, hit the “Prepare Document” button.
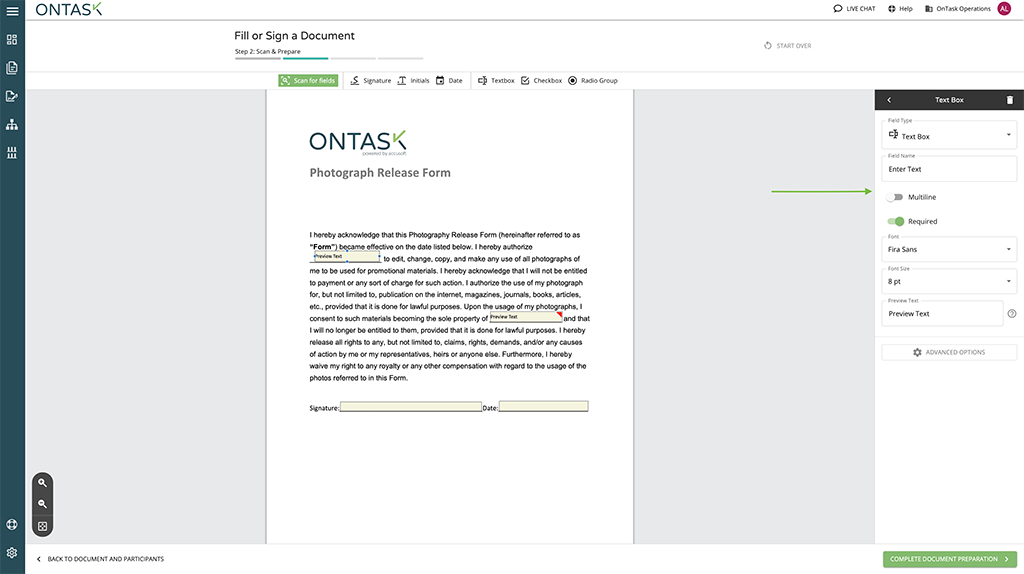
7. When you click the “Prepare Document” button, you can view the document and manually place any fields you’d like to include, such as signature fields or date fields. You can also use the scans for fields tool, which will actually scan the document for you, pick up those fields and place the boxes down as well. We’ll give it just a moment to finish scanning here.
8. If you’ve scanned your document, there may be extra fields you don’t want to include. In that case, simply click on the field in question and delete it. You can also toggle on whether you want the field to be required or not, and move its location.
9. Once all your fields are placed in the appropriate places, you can go ahead and hit the “Complete Document Preparation” button.
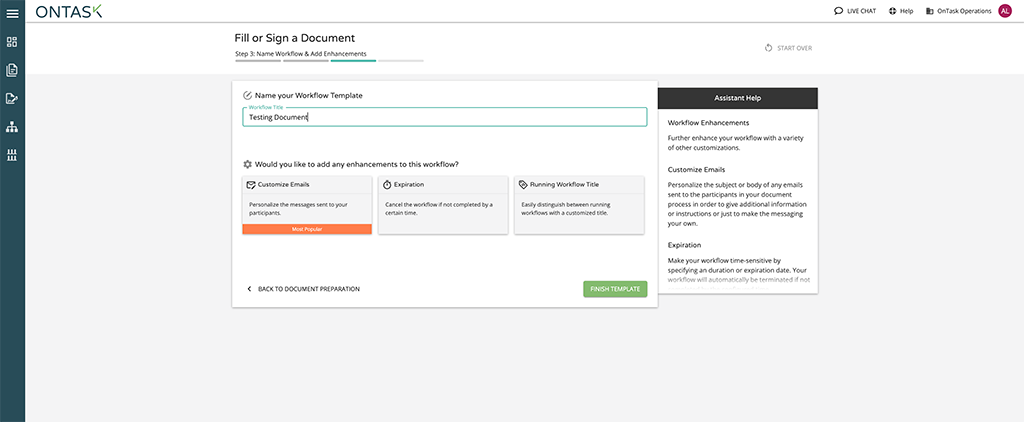
10. Now it’s time to name your template. Under the “Workflow Title” field, add the name of your new document.
11. From this screen, you can also customize the emails that will be sent to your signees. Simply click the “Customize Emails” selection to add your own text. Be sure to hit the “Save Changes” button before continuing.
Setting a Workflow Expiration
Another option available to you is to set an expiration on your workflow, which means the workflow will be canceled if it is not completed in a specific amount of time. You can set an expiration for the workflow to cancel at a certain time if you’d like. Or, you can leave it as-is and the workflow will never expire.
Running Workflow Titles
You can also set a running workflow title to help you distinguish between different instances of your workflow that may be running at the same time. For example, if two people are filling out the same survey. You can add in templated names like the sender’s name, sender’s email, applicant name, or applicant email to name a few options. This auto-populates with whatever information is input by the user
12. Finally, click the “Finish Template” button. You’re all set!

Now, you can click the “Run Workflow” button to get your form filled out or share it using the link provided by Docubee.
Do Users Need to Log In to Docubee to Fill & Sign?
Documents sent through Docubee will come pre-populated with the user’s information if they are logged into Docubee. But, employees or other users don’t need an account to use Docubee. Anyone can access their link and fill in documents without logging in.
Options for Applying a Signature
There are a few different ways to add a signature to a document in Docubee. You can either type it and pick the font, or draw it using your mouse or finger.
What Happens After the Document is Signed?
Once the signer has signed their document, you will get an email with the completed document. Copies will also be sent to all signers and anyone you designated during the setup of your template. Simply click the download button with the email to download and save the signed document and its audit trail.
